 |
| This cake (staying cool outside on the snowy deck) has tangy vanilla buttermilk cake, creamy-but-not-quite-sweet frosting with ricotta, lemon, honey, marscapone and Greek yogurt, and a crowing pile of juicy red cherries. It's a combination made in heaven.
Historically, I haven't been much of a baker or a dessert enthusiast--I've never had much taste for sweets, and baking requires a far more meticulous eye for directions than my natural cooking disposition allows for. Even when I am baking, I never measure baking power, salt, vanilla, etc. Hence, about half my sweet baking projects turn out horrible, fueling my anti-baking cycle.
But occasionally--and apparently especially when pregnant--I get the urge to bake. In the last few weekends, I've made a new dessert each Saturday afternoon. One was smittenkitchen's Blood Orange, Almond, and Ricotta Cake, (but I used mixed citrus--grapefruit, lime, and orange). To go with this, I made a barely-sweet marscapone and Greek yogurt "whip cream", which had honey, lemon zest and juice, and vanilla.
 
This was for my brother-in-law's engagement party, and the cake both looked pretty and tasted delicious. The tangy cream on the side really sent it over the edge--and ALSO started me on the kick of making creamy marscapone-and-ricotta baked goods, leading eventually to the fabulous buttermilk cherry cake.
Next I made some homemade cherry Danishes. This also led to the invention of the frozen-dried-jam cherry sauce for the cake. The recipe, which I came across in a New York Times "What to Cook This Week" column, appealed to me because I'd never made Danish before, and because it looked like the sort of engrossing, complicated kitchen project I was in the mood for. Putzing around in the kitchen, completing hours-long cooking projects while listening to music or podcasts--this has been one of my favorite weekend pastimes. And I have a feeling experimental, all-day cooking is going to shortly take a backseat to my new hobby of baby-death prevention. So I have been wanting to enjoy it while I can.

The Danishes came out really yummy, but honestly weren't worth the work. All the flavor came from the cheese and cherries--the yeast-butter dough, though interesting, wasn't especially fabulous. You could put the cheese-cherry combo on any number of other, far-easier bases. But if you want to try baking your own Danish from scratch, here is the recipe.
Anyway--to the cake!
I must say this is up there with the best cakes I've even made. Even better, maybe, than that amazing coconut layer cake I made a couple summers ago. It was so, so, so good.
The buttermilk cake was the perfect base--and the tangy, not-quite-sweet, complex frosting--made with whipped cream, marscapone, ricotta, Greek yogurt, honey, lemon, and vanilla--was the perfect foil for the very sweet, very over-the-top-CHERRY-NESS of the cherry "sauce". This cherry sauce is my own invention and I think it's brilliant--and its formula can be applied to a ton of different fruits. What you do is take a bag of frozen cherries, a bag of dried cherries, a small jar of cherry jam, and an envelope of powdered flavorless gelatin, then boil everything together for a couple of minutes. The liquid from the frozen cherries and melted jam re hydrate the dried cherries, and the gelatin thickens it into the perfect saucy-but-not-runny consistency (the pectin from the jam contributes, too). It would work with apricots, pineapple, blueberries--anything. It makes a sweet, concentrated sauce that screams the flavor of the fruit. ULTIMATE CHERRY GOODNESS. Way, way better than any cherry pie filling I've ever tried.
So! To the cake! You need 3 separate recipes, which you then assemble into the cake. 
Recipe for the Cake
This will make two 9-inch cake pans. You can make a layer cake, like I did this time, or two single cakes (this might be excellent if you are using fresh fruit in the summertime--two cakes piled with different fresh fruit).
Note--the original recipe calls for 1 1/3 cup of sugar--I cut this to 3/4 cups (ish--didn't measure) because I wanted a distinct contrast between the less sweet, tangy cake and the sugar-cherry crush of the sauce.
Once frosted, pile the cherries onto the middle of the top. Don't worry if some juice drips along the sides. Or--just make it because you feel like it! Enjoy!!!! |
Sunday, February 14, 2016
Buttermilk Cake with Ricotta-Marscapone Frosting and Cherries


Saturday, February 6, 2016
All Day Meat Ragu
 |
| Heavenly meat sauce. |
ALL DAY MEAT SAUCE
Every carnivore ought to have a phenomenally impressive meat sauce at the ready. This is one of those "recipes" you don't need a recipe for. It's a formula, and can be adjusted several ways--and exact proportions are unimportant. And it is perfect and delicious every single time. You cannot mess this up.
This ragu is a hearty, richly-flavored and intense tomato meat sauce, perfect for the snowy winter weather we're having in Denver now. Incredibly rich, complex and satisfying, it is an impressive and welcoming dish for a dinner party, or you can keep it in the fridge and eat it gradually over the course of a mid-winter week. It reheats excellently and gets better over time.
It is just incredibly delicious. And, though it takes at least several hours to complete, most of that is braising time--it's really an easy recipe.
And this can be varied in a number of ways. I've made it with half of a bone-in leg of lamb, with a skinless pork butt, with short ribs, or with a beef chuck roast (the cheapest way! and always phenomenal tasting). Below is the beef chuck version, which is fabulous--but all of these are excellent. Depends what you have on hand and are in the mood for.
This recipe makes a full pot of sauce in my 6 quart dutch oven--this is enough for more than a dozen hearty eaters.
Ingredients (in order of use)
1 beef chuck roast (3 ish pounds)
salt
pepper
flour
olive oil
6 or so strips of bacon (I like a smokey, thick-cut kind)
3 white onions, diced small
1 bottle of red wine
5 16 oz cans of tomatoes (I usually use 3 cans of crushed and two of diced)
sugar
2 or 3 raw beef soup bones OR a raw pork hock (these are usually quite cheaply available in the meat section of any grocery store)
2 heads of garlic, minced
Directions
I like to start this the day before I want to eat it--but you could also start it in the morning and plan to have it for dinner. The flavor deepens as it sits.
First, take out your large, lidded pot and pour in a few glugs of olive oil. Unwrap your chuck roast and pat dry with paper towels. Generously season the roast with salt and pepper, then dust it with flour (2 or 3 tablespoons should suffice). Turn the heat on under the pot--when the oil shimmers, brown the roast on all sides--a few minutes per side should be fine. Remove the browned roast and place it on a plate.
Dice up your bacon and add it to the pot. Let it cook for a couple of minutes, until a good amount of the fat has rendered but isn't entirely crisp. Then, add the onions. Cook for 10 minutes or so, stirring every so often. These should get translucent and take on a little color, but not caramelize much.
Add the bottle of wine. Dump in the whole thing, unless you happen NOT to be pregnant, in which case you can pour yourself a glass to enjoy while you finish cooking, then dump in the rest of the bottle. In my chunky sober case, the whole bottle went in. Sadness. Only a few more months.
As the wine boils, scrape the bottom of the pot. Allow the wine to boil and reduce for a few minutes. Add your canned tomatoes. Sprinkle a tablespoon or so of sugar on top--this eliminates the tinny metallic taste from the canned tomatoes.Make sure there remains a few inches of space at the top of the pot--you need room for your roast and the soup bones. Mix the tomatoes and wine together and bring to a boil.
Add the beef roast and the soup bones. Submerge them in the sauce. (The bones--or pork hock--add collagen to the sauce as they cook--this results in a silky richness and a depth of flavor the sauce would otherwise lack. If you are using meat that includes bone--shortribs or a leg of lamb--it's not necessary to add bones to the braise).
Turn your oven on to 300 degrees. Cover the pot and place it in the oven. Then, walk away for four hours.
After four hours have elapsed, turn off the heat, and remove the pot and leave it covered. Allow the sauce to cool completely (I just turn the oven off, and leave the sauce pot in there overnight). When the sauce is cool, skim any grease you can off the top and throw is out. Remove the soup bones and toss them (or give them to your dogs). Remove the roast and shred the meat, using forks or your fingers. Add it back to the pot, mix well. Taste for salt--you may want to add a few teaspoons more. Viola! The sauce will be deep red, meaty, and utterly delicious.
Serve over a pasta with some traction--I like rigatoni, or spirals, or linguine.
To make herby ricotta--chop up a bunch of parsley and a bunch of basil--mix with whole milk ricotta. Place a dollop on each plate of pasta and sauce.

It is just incredibly delicious. And, though it takes at least several hours to complete, most of that is braising time--it's really an easy recipe.
And this can be varied in a number of ways. I've made it with half of a bone-in leg of lamb, with a skinless pork butt, with short ribs, or with a beef chuck roast (the cheapest way! and always phenomenal tasting). Below is the beef chuck version, which is fabulous--but all of these are excellent. Depends what you have on hand and are in the mood for.
This recipe makes a full pot of sauce in my 6 quart dutch oven--this is enough for more than a dozen hearty eaters.
Ingredients (in order of use)
1 beef chuck roast (3 ish pounds)
salt
pepper
flour
olive oil
6 or so strips of bacon (I like a smokey, thick-cut kind)
3 white onions, diced small
1 bottle of red wine
5 16 oz cans of tomatoes (I usually use 3 cans of crushed and two of diced)
sugar
2 or 3 raw beef soup bones OR a raw pork hock (these are usually quite cheaply available in the meat section of any grocery store)
2 heads of garlic, minced
 |
| Linguine with beef ragu, topped with herby ricotta. |
I like to start this the day before I want to eat it--but you could also start it in the morning and plan to have it for dinner. The flavor deepens as it sits.
First, take out your large, lidded pot and pour in a few glugs of olive oil. Unwrap your chuck roast and pat dry with paper towels. Generously season the roast with salt and pepper, then dust it with flour (2 or 3 tablespoons should suffice). Turn the heat on under the pot--when the oil shimmers, brown the roast on all sides--a few minutes per side should be fine. Remove the browned roast and place it on a plate.
Dice up your bacon and add it to the pot. Let it cook for a couple of minutes, until a good amount of the fat has rendered but isn't entirely crisp. Then, add the onions. Cook for 10 minutes or so, stirring every so often. These should get translucent and take on a little color, but not caramelize much.
Add the bottle of wine. Dump in the whole thing, unless you happen NOT to be pregnant, in which case you can pour yourself a glass to enjoy while you finish cooking, then dump in the rest of the bottle. In my chunky sober case, the whole bottle went in. Sadness. Only a few more months.
As the wine boils, scrape the bottom of the pot. Allow the wine to boil and reduce for a few minutes. Add your canned tomatoes. Sprinkle a tablespoon or so of sugar on top--this eliminates the tinny metallic taste from the canned tomatoes.Make sure there remains a few inches of space at the top of the pot--you need room for your roast and the soup bones. Mix the tomatoes and wine together and bring to a boil.
Add the beef roast and the soup bones. Submerge them in the sauce. (The bones--or pork hock--add collagen to the sauce as they cook--this results in a silky richness and a depth of flavor the sauce would otherwise lack. If you are using meat that includes bone--shortribs or a leg of lamb--it's not necessary to add bones to the braise).
Turn your oven on to 300 degrees. Cover the pot and place it in the oven. Then, walk away for four hours.
After four hours have elapsed, turn off the heat, and remove the pot and leave it covered. Allow the sauce to cool completely (I just turn the oven off, and leave the sauce pot in there overnight). When the sauce is cool, skim any grease you can off the top and throw is out. Remove the soup bones and toss them (or give them to your dogs). Remove the roast and shred the meat, using forks or your fingers. Add it back to the pot, mix well. Taste for salt--you may want to add a few teaspoons more. Viola! The sauce will be deep red, meaty, and utterly delicious.
Serve over a pasta with some traction--I like rigatoni, or spirals, or linguine.
To make herby ricotta--chop up a bunch of parsley and a bunch of basil--mix with whole milk ricotta. Place a dollop on each plate of pasta and sauce.

I cannot recommend this enough. It's absolutely delicious.
Enjoy!
Sunday, January 31, 2016
Duck Liver Pate
 |
| Summer of 2015 was one for the record books! |
 |
| That magical mousse de canard from Pate Johny. The smaltz got a bit melted as it sat in our pannier bags on teh pre-lunch ride. |
 |
| Another picnic on the trip, between Champagne and Burgundy. Champagne, bread, organ meats and cheese at the edge of a vineyard. Heaven. |
As soon as I got back to Denver, I became obsessed with the quest to recreate this myself. I learned that the traditional mousses I had in France are emulsified mixtures of duck liver, pork fat, egg yolks, cream, salt and spices, and brandy. Everything is blended or whipped together, then cooked gently in a terrine sitting in a water bath until it sets.
Well, this preparation--gorgeous and traditional as it was, seemed pretty difficult. I decided, instead of duck liver mousse, to make duck liver pate, using Jacque Pepin's simple Chicken Liver Pate recipe as the base. Whereas a mousse is emulsified and cooked, a pate is merely cooked, blended, and chilled--much easier.
Pro tip for Denver people--you can often find duck livers at Oliver's Meat Marker, sold in 1 pound tubs in the frozen section. This is also the best butcher's in town. And, Denver people, do you want to eat duck liver mousse but don't feel like cooking any? There is a fabulous version at Argyll on 17th. Really, really good.
Or you can make it yourself! It's really not a tough project at all.
Because the livers come in 1 pound tubs, I made a recipe using 1 lb of them.
Ingredients:
1 pound of duck lives, defrosted, patted dry, with the whitish, cartilege-looking membrane thingys cut off
2 sticks unsalted butter
4 tablespoons duck fat, plus 2 more for the fat seal*
2 egg yolks
1 large or 2 small shallot(s), chopped
4 cloves of garlic (fine to leave these whole)
salt
black pepper
1/2 teaspoon of thyme leaves (dried or fresh is fine)
very scant shake of clove
very scant shake of allspice
2 tablespoons brandy
What To Do
Melt one stick of the butter in a saute pan over medium heat. Add the shallot and garlic and saute for a couple minutes until softened.
Toss the livers into the pan and cook on both sides, but gently. Cook for a minute, then toss, cook for a minute, toss, cook for a minute, toss. Turn off heat and allow the livers to sit in the hot pan for another minute--you want them cooked, but still pink on the inside.
Put the hot livers and everything in the pan (aromatics, butter, everything) into a blender. Add the two egg yolks and begin blending on high. The heat from the livers and butter will gently cook the egg as it blends.
As it blends, add a shake of salt, a shake of black pepper, the thyme leaves, the pinch of clove and allspice, the brandy. It should be blending this whole time. Then, add the remaining butter a tablespoon at a time by dropping it into the top of the blender. Add the 4 tablespoons of duck fat.
Overall, this should be blending for at least five minutes. You want it very very smooth. Blend longer if there are any traces of chunks.
Pour the mixture into ramekins or shallow jars (mine made enough for 2 ramekins, two small jam jars and one medium jam jar).
Then, melt the remaining two tablespoons of duck fat (butter is fine too) in a pan. Very gently and carefully, pour the thinnest possible layer over the top of the pates. Pour gently so it disturbs the tops of the pate as little as possible.
Cover with lids or plastic wrap and refrigerate for at least 3 hours before serving. Serve with toasted bread, and, if you have it, spiced onion jam (will provide recipe for this sometime soon).
Honestly, this was FABULOUS. Several people who had never eaten liver before raved about it. I served some as an appetizer for a dinner party and it was inhaled. This recipe is is infinitely more delicious than the same one made with chicken livers. It's not as bright a pink as the ones I had in France, but the flavor is spot-on. Really, really lovely and delectable. Makes a gorgeous lunch spread on a toasted baguette with a side salad and a glass of white wine. Or a first course for a dinner party (maybe followed by some legs of duck confit and potatoes?) Or snack to have out over cocktails during the holidays. Serve with toasted baguettes, and maybe some small pickles. If you can make some spiced onion jam to go with, do it.
This pate is just really, really killer. And NOBODY makes this sort of thing at home! It's so easy and so delicious--there is no reason not to.
Enjoy!
EPILOGUE
Well, shortly after Adam and I returned from our fabulous double-income no-kids summer of wine and organ meats, we brought this stage of life to an end, for reasons not entirely clear to either of us, still. Why did we decide to have a kid? Were we sick of free time and extra income? Did we begin to hate sipping scotch and reading after work in perfect peace and quiet? Did I think to myself, why have a nice ski season this winter when, instead, I can get massively fat?
No, not exactly. I am trying to remember our reasons. Mostly, I had a feeling I might regret not having had children later, if I didn't do it now--and Adam thinks babies are cute because they have jowls. That was basically the math.
So we kind of shrugged and were like, "okay, let's try." And, aided by the powers of my meaty-titted Catholic bloodline, I was pregnant shortly thereafter. We are expecting a baby boy in May!
And then I could not stand the sight or smell of duck pate. I made about 3 containers from this recipe. Did Adam eat the other ones? Did he toss them when he generously gave the fridge a deep cleaning because I thought it smelled weird? Cannot remember.
Duck pate is not a foodstuff that agrees with the first trimester of pregnancy.
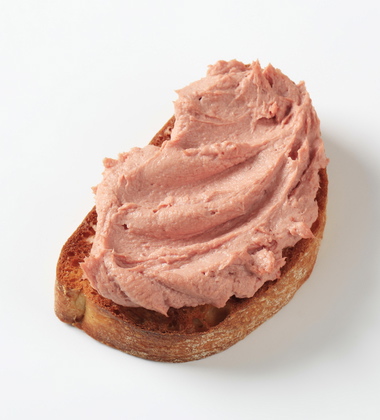 |
| Delicious. |
*Don't have duck fat? Two options. Option 1, you can make some. Get yourself down to the Asian supermarket and purchase a few packages of duck legs. These are available inexpensively from Pacific Ocean Market, if you're in Denver. Make a recipe of cheater's duck confit, and enjoy it for a luxurious dinner, while saving the fat for this recipe and general cooking enhancement (cook potatoes in it, yummmm) Option 2: Use more butter instead.
,
Thursday, July 16, 2015
Sweet Corn Pudding for a Mexican Feast!
I wrote this post maybe a year ago, then forgot about it! It really is an amazing side dish, sure to be a hit.
 |
| From left: beef shank in pipian mole, tortillas, chile-lime-garlic pork shoulder, charred onions with herbs, chimichurri, salsa verde, roast chiles, corn pudding, jicama slaw, salsa roja. UTTERLY DELICIOUS. |
 |
| Food's ready! |
 |
| My plate: beef with chimmi and pork with salsa verde. And charred onions on both. I went back for corn pudding afterwards. Several times. |
Awhile back, Adam and I hosted out traditional "don't forget we exist" barbecue in our backyard. I think this is the second one--maybe the third? This event is to put ourselves back on the social radar of our not-in-the-ski-house friends, whom we've ignored for six months.
This year was particularly great. Some of my favorite new colleagues were there, plus two baby puppies, one adorable child, and many of our favorite people in Denver. And the food was BOMB. I went with Mexican food, because Mexican food is the most delicious single cuisine on the planet.
Here is a recipe for corn pudding, which was a huge hit. It was eaten up completely by meat eaters and vegetarians alike. It tasted rich and creamy and wildly corn-y.
Corn Pudding for Tons of People (play with the ratios feed a more normal-sized group)
Ingredients
(all the vegetarians put this in their tortillas instead of meat--goes great with the salsa)
20 ears of shucked freshcorn
2 cups of coarse corn meal
2 quarts (or so) of whole milk
1 stick of salted butter
1/2 cup brown sugar
salt to taste (about a tablespoon)
Pinch of cayenne (this won't be discernible in the final dish, but will add an element of depth)
What to do:
Cut the kernels off the corn. Use the large, covered pot you plan to cook the pudding in: hold the cob vertically and cut downward, scraping as close to the cob as you can.This is annoying and will take awhile.
Add the two cups of coarse corn meal to your pot with the kernels.
Add the milk and sugar, and a heavy dash (2 teaspoons to start) of salt.
Mix all ingredients together.
Place the pot over low heat and cook, stirring every few minutes, until the corn meal has completely absorbed the milk. If it seems too dry, add more milk and continue cooking.
Add the butter and pinch of cayenne, and stir until completely incorporated. Taste for salt.
Then, look at the consistency and use your judgement--it is a pleasingly pudding-like texture? Play with the cornmeal and milk ratios until it's perfect.
Serve!
Enjoy!
Saturday, March 14, 2015
Buttermilk Panna Cotta
 |
| I made balsamic macerated raspberries to top this version. |
Panna Cotta isn'tt something I had ever thought to make at home before, and a dessert I'd only even eaten once, when a little cube of it was included on an artsy-looking modern dessert at Del Posto a few years ago.
But there was a recipe for it in a used cookbook I recently bought called Chefs of the Times, which is a compilation of a column the New York Times used to run, where it included chefs' thoughts about how they developed recipes in addition to the recipes themselves. The book itself if very late 90s--basically every chef has a different risotto recipe. I enjoyed reading it from cover to cover, and the recipe that stuck most in my mind was for this buttermilk panna cotta.
It was incredibly easy, just as the recipe promised--and unbelievably delicious. It tastes like rich, smooth cheesecake--just a bit tangy and not too sweet. It's the best new recipe I've tried in a really long time. I'm not usually particularly interested in desserts--but this one was fantastic.
I've made it twice recently: once, for a dinner party at my sister's, and for my husband's birthday. For the first batch, I decorated it with balsamic macerated rasperries, and for the second, with warm pecan salted caramel. Both were fantastic, and really, this would go with anything.
You can make a large panna cotta and slice it to serve, or you can make individual ones in a muffin tin.

 |
| Yum. |
- 2 envelopes unflavored, powdered gelatin
- 1 cup whipping cream
- 1 teaspoon finely grated lemon peel
- 1/2 cup sugar
- 2 cups buttermilk
- 2 teaspoons vanilla extract
- Whatever garnish you want--the possibilities are endless.
Lightly spray six 3/4-cup ramekins or custard cups with nonstick spray. OR whatever you are going to put the panna cotta into. If you don't have ramekins, muffin tins work just as well
Heat cream, buttermilk, lemon peel, and sugar in medium saucepan over medium-high heat, stirring constantly until sugar dissolves. Increase heat and bring just to low boil, stirring occasionally. Add gelatin and whisk like crazy. Remove from heat. Add vanilla. Whisk until there are no gelatin lumps. Cool mixture to lukewarm, stirring often. Refrigerate panna cotta until set, about 4 hours.
DO AHEAD: Can be made 2 days ahead. Cover and keep chilled.
DO AHEAD: Can be made 2 days ahead. Cover and keep chilled.
Again this SO so delicious. It's the sort of dessert you only expect in a restaurant, but couldn't be easier to make at home.
Enjoy!
Saturday, March 7, 2015
Pad Thai
 |
| Pad Thai for a crowd! |
During this hectic time, I've been cooking quite a bit--but just haven't bothered to take pictures of anything I made, let alone write it up.
So, I finally remembered with this Pad Thai, which I made last Tuesday night. I have been revising and re-revising my Pad Thai recipe for about a year--and I've finally settled on the definitive version. My recipe is authentic enough in a white-washed way, not crazily intricate or inclusive of impossible-to-find ingredients, like most of the pad thai recipes online written by actual Thai cooks. (The best website for actually-authentic Thai recipes is Thai Table, whose pad thai recipe includes preserved turnip and banana flower.) On the other end of the spectrum are super-whitewashed pad thai recipes, whose egregious, gross Americanizations include using ketchup or including turkey and a fucking slow cooker! No no no. This is Republican-mom recipe whitewashing, what Ann Romney probably thinks is pad thai.
On the Democrat side of fucking-up recipes, you have bullshit of the cider-vinegar, vegan, agave-syrup variety--even calling this "pad thai" is just wishful, deluded thinking on the part of sad, shivery, anemic vegans, consoling themselves with these disgusting fake noodles in the dark, skinny evenings of their empty and virtuous lives.
So my recipe is authentic-enough, makes no attempt at health consciousness, and tastes AMAZING. The one ingredient you need to go to an Asian market for is tamarind paste or tamarind concentrate (the paste is a solid, gummy block--the concentrate is liquid). Although, you can often find tamarind concentrate in a Hispanic market, too--just be careful not to buy the pre-sweetened kind.
All measurements are mere suggestions. I have never measured this. But this is an inexacting recipe--measurements are unnecessary.
This amount feeds 6-8 people. I always make this for a crowd. Last Tuesday I made it for Bachelor Night, for eight-ish people, and finished all of it.
Just halve things if you want dinner for two, plus leftovers.
Ingredients
2 or 3 packages of Pad Thai rice noodles
garlic
shallots
peanut oil
tamarind concentrate
fish sauce (Thai or Vietnamese)
brown sugar
2 or 3 eggs
bean sprouts
crushed peanuts
cilantro
lime
optional spicy stuff of your choice
Step 1: Soak two or three packages of rice noodles. Go buy dried or fresh pad thai rice noodles(you can find fresh in Asian supermarkets. Shout out to Pacific Ocean Marketplace). You can use thin, traditional pad thai noodles(often called "rice stick"), or thicker rice noodles usually used for Pad Seau. Put them in a bowl of room-temperature water with a few drops of peanut oil. Soak while you do everything else. NEVER BOIL RICE NOODLES.
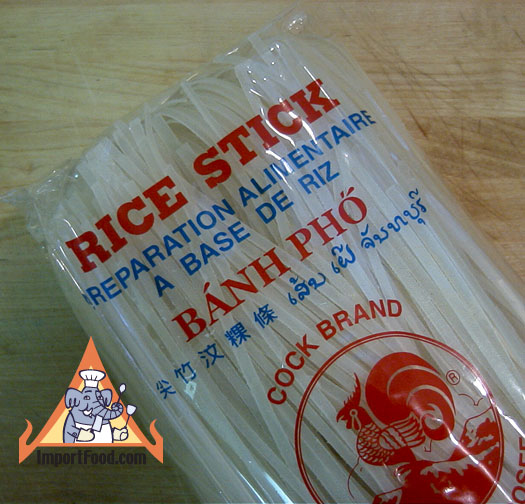 |
| What I usually buy. |
Step 3: Dice up a BIG HANDFUL of garlic cloves (10-12 cloves) and two big handfuls of shallots. This is the most annoying part of the whole recipe.
Step 4: Cook! Ok, here is what you do: pour enough peanut oil into the bottom of your pot to coat it, then heat the oil up on high heat. When shimmering, toss in your minced garlic and shallot and fry, stirring frequently, in the oil for about 3-4 minutes. This will infuse the oil with these flavors, and mellow the aromatics out a bit.
 |
| Garlic and shallots frying in peanut oil. |
Then, drain your noodles and place them in the hot pan. Use tongs to turn them--they'll slowly soften and cook. After about 3 minutes, add the sauce, then continue turning.
When noodles are hot and cooked, break two or three eggs over the noodles, and turn with tongs some more, until the eggs are broken and softly cooked, clinging to the hot noodles.
Then, toss in two handfuls of white bean sprouts, turn with tongs to incorporate into the noodles.
Step 5--finish! Top the noodles with a cup of crushed peanuts (put cocktail peanuts in a bag and step on them) and a bunch of chopped cilantro (buy one bunch, rinse and chop) (note--in the pictures I have green onions instead of cilantro, because the market was out). Quarter several limes and serve on the side for people to juice onto their portions. Some people might want soy sauce, for more salt. I also serve mine with sriracha, but that's just me.
 |
| Mountain of noodles, ready to be attacked. |
 |
| My (first) plate. I used thicker rice noodles this time. |
Enjoy!
Sunday, July 27, 2014
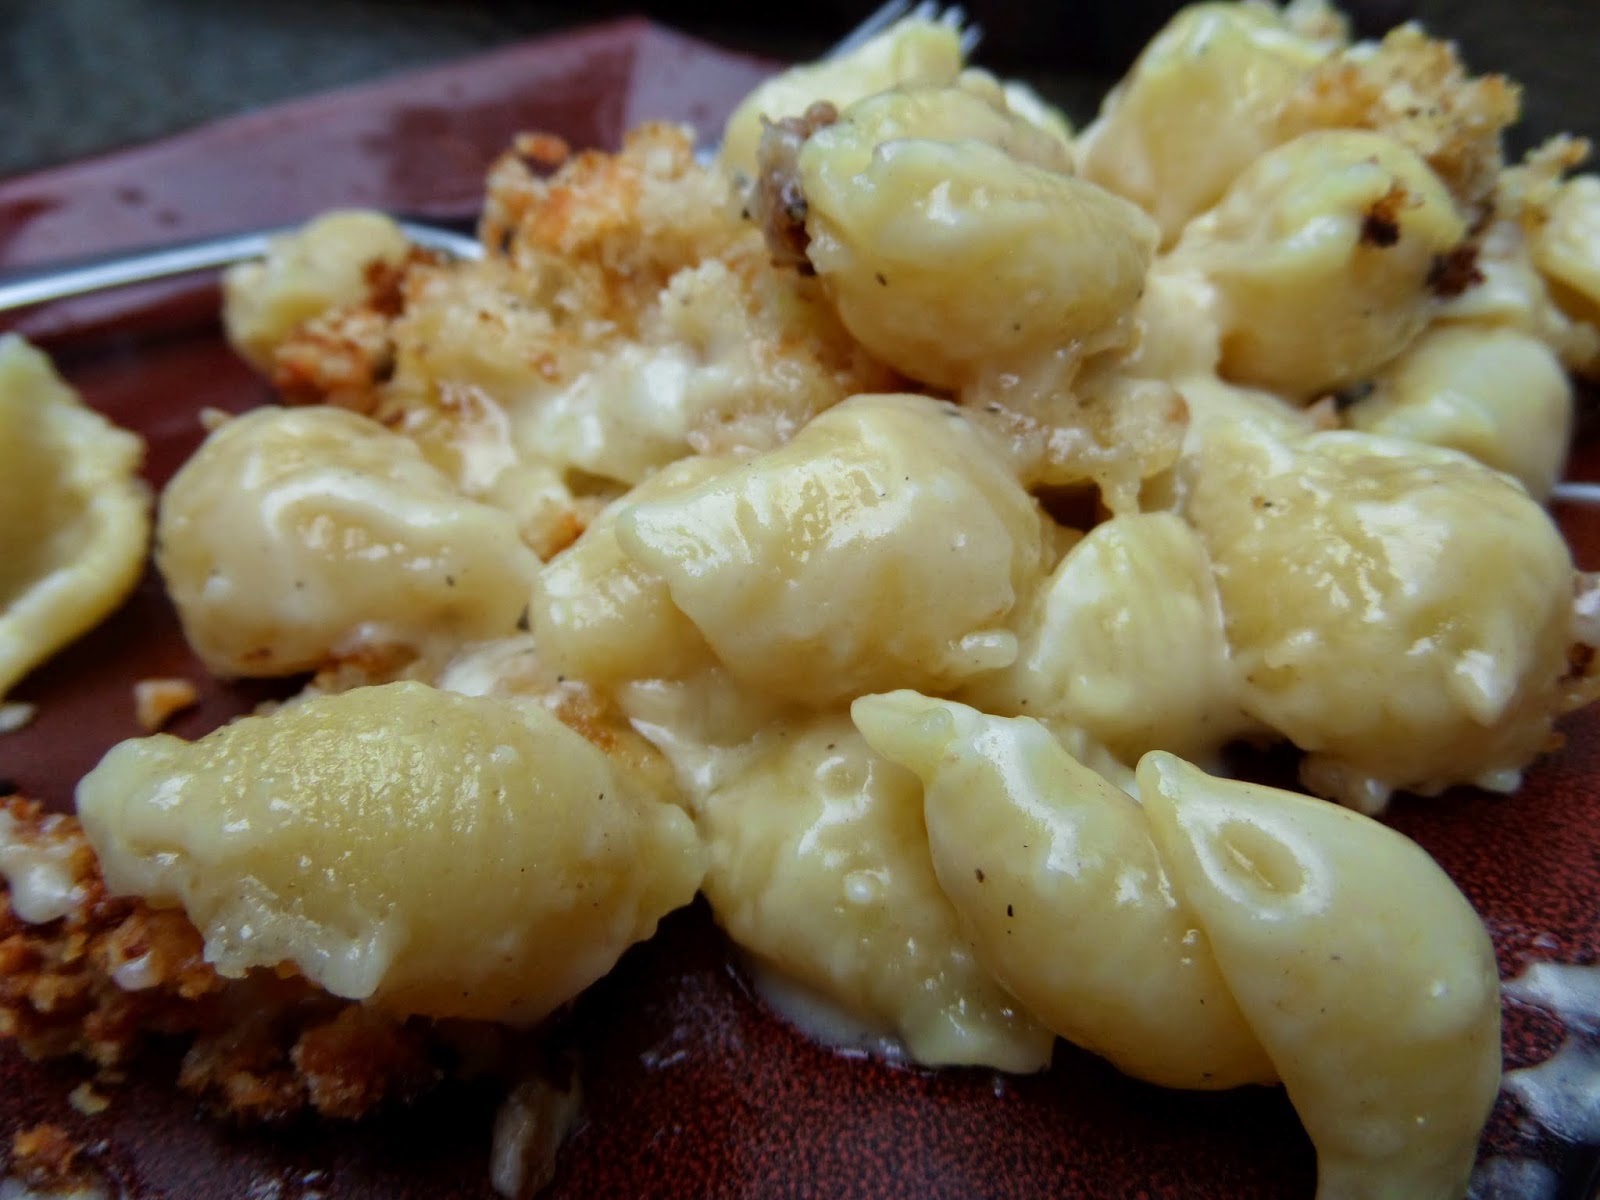
Adult Mac and Cheese

 |
| This mac-and-cheese contains gruyere, gouda, fotina, cheddar, and parmesan. Enjoy with champagne, a nice green salad, and gratitude for one's lack of children. |

I have never had raclette or comte in my life. And what on earth is Der Sharfer Maxx??? Sounds like a bad-ass biker cheese.
I set about trying to recreate this insanely mind-blowing food experience, but with the cheese offerings of my local Alberston's:
 |
| Ingredients! |
I ended up using fontina, gouda, gruyere, and my all-time favorite, extra-sharp aged white cheddar from Cracker Barrel.
This was the first time I've made mac and cheese at home. Why? Well, a small part of the reason is that my husband is lactose intolerant: the price of a dairy-heavy dinner is being hot-boxed all night by noxious, unrelenting ass.
But really, the main reason I haven't even though to make mad and cheese is that it's a food associated with the worst eaters in humanity: American children. You think mac and cheese, you think a picky four year old who only eats mac and cheese, chicken nuggets, fries and apple sauce. You think dinosaur-shaped pastas drowning in neon hell sludge. You think of children's menus. (why the fuck are children's menus even a thing? Can a child in a restaurant not simply eat a smaller amount of gnocchi or risotto or lamb chops? Why do we send children the message that hot dogs and grilled cheese are specifically their food? Why lead them down a fake-cheese and chicken-finger paved road to impacted bowels, obesity, culinary philistinism and a lifetime of microwaving Swanson's freezer bags of failure?)
 |
| Nightmare. |
The culturally accepted food of American children is foul, beige, processed, bland bullshit, and as a rule I want nothing to do with it.
My house, kitchen and life away from work are adult-only spheres: rare meat, dark green salads, anchovy vinaigrette, noodles with chiles and fish sauce, gorgonzola, strong homebrew, Scotch, large travel expenditures, 11 am weekend wake-ups, homemade hot pickles, The Wire, casual nudity, and multi-day cooking projects.
I'm sure if we ever actually produce a small human, it will automatically pop out enjoying stouts, short ribs and braised cabbage and I won't have to change my habits at all.
Anyway--the mac and cheese at Caseus changed my whole mac-and-cheese paradigm. As I shared a bottle of wine and dug in I realized: mac and cheese is legit amazing, in certain forms. And! Perhaps mac and cheese can be a suitable adult foodstuff! My mind was blown.
 |
| Let's spend the whole afternoon eating mac and cheese and drinking champagne on the deck! |
 |
| Consuela loves this sort of thing. |
Ingredients
1 pound of large pasta shells
1 pound of large pasta shells
1 quart of whole milk
4 tablespoons of butter
3 tablespoons flour
2 teaspoons dry mustard powder
1 head of garlic, minced
1.5 ish cups shredded gruyere (just shred the whole block)
1.5 ish cups shredded gouda
1.5 ish cups shredded fontina
2 cups shredded extra-sharp white cheddar
2 cups panko bread crumbs
1 cup shredded parmesan
 |
| So much cheese. |
Boil some salted water for the pasta. Cook the pasta for 2-3 minutes less than the cooking time on the bag / box calls for, as you will also be baking it, and you don't want it to get mushy.
Grease a casserole. Preheat the oven to 350.
Melt the butter in the bottom of a large pot. When it's completely melted, add the flour and stir constantly, allowing the flour to become caramel brown, about 3-4 minutes. You made a nice roux! Add the mustard powder, about a tablespoon of the minced garlic, and a big pinch of black pepper. Stir for another 30 seconds to fry your spices, then add the quart of milk.
Whisk the milk mixture until it steams up, just on the edge of boiling. Then, add all the shredded cheese and whisk like crazy. Keep the pot on the heat, whisking, until the sauce is smooth and hot, just on the edge of boiling.
 |
| cheese sauce! |
Add the cooked pasta. Mix the pasta into the sauce, then pour into the greased casserole. It's ok if it looks a bit soupy at this point--as you bake it, a lot of the liquid will be soaked up by the pasta, and some sauciness will only enhance the luxury of the final product.
 |
Add the bread crumbs to a dry saute pan. Add the remaining garlic and the parmesan. Toss over a flame until golden and crunchy, then scatter evenly over the top of the casserole full of pasta and cheese sauce.
Bake at 350 for about half an hour--until cheese is bubbling and the top is golden.
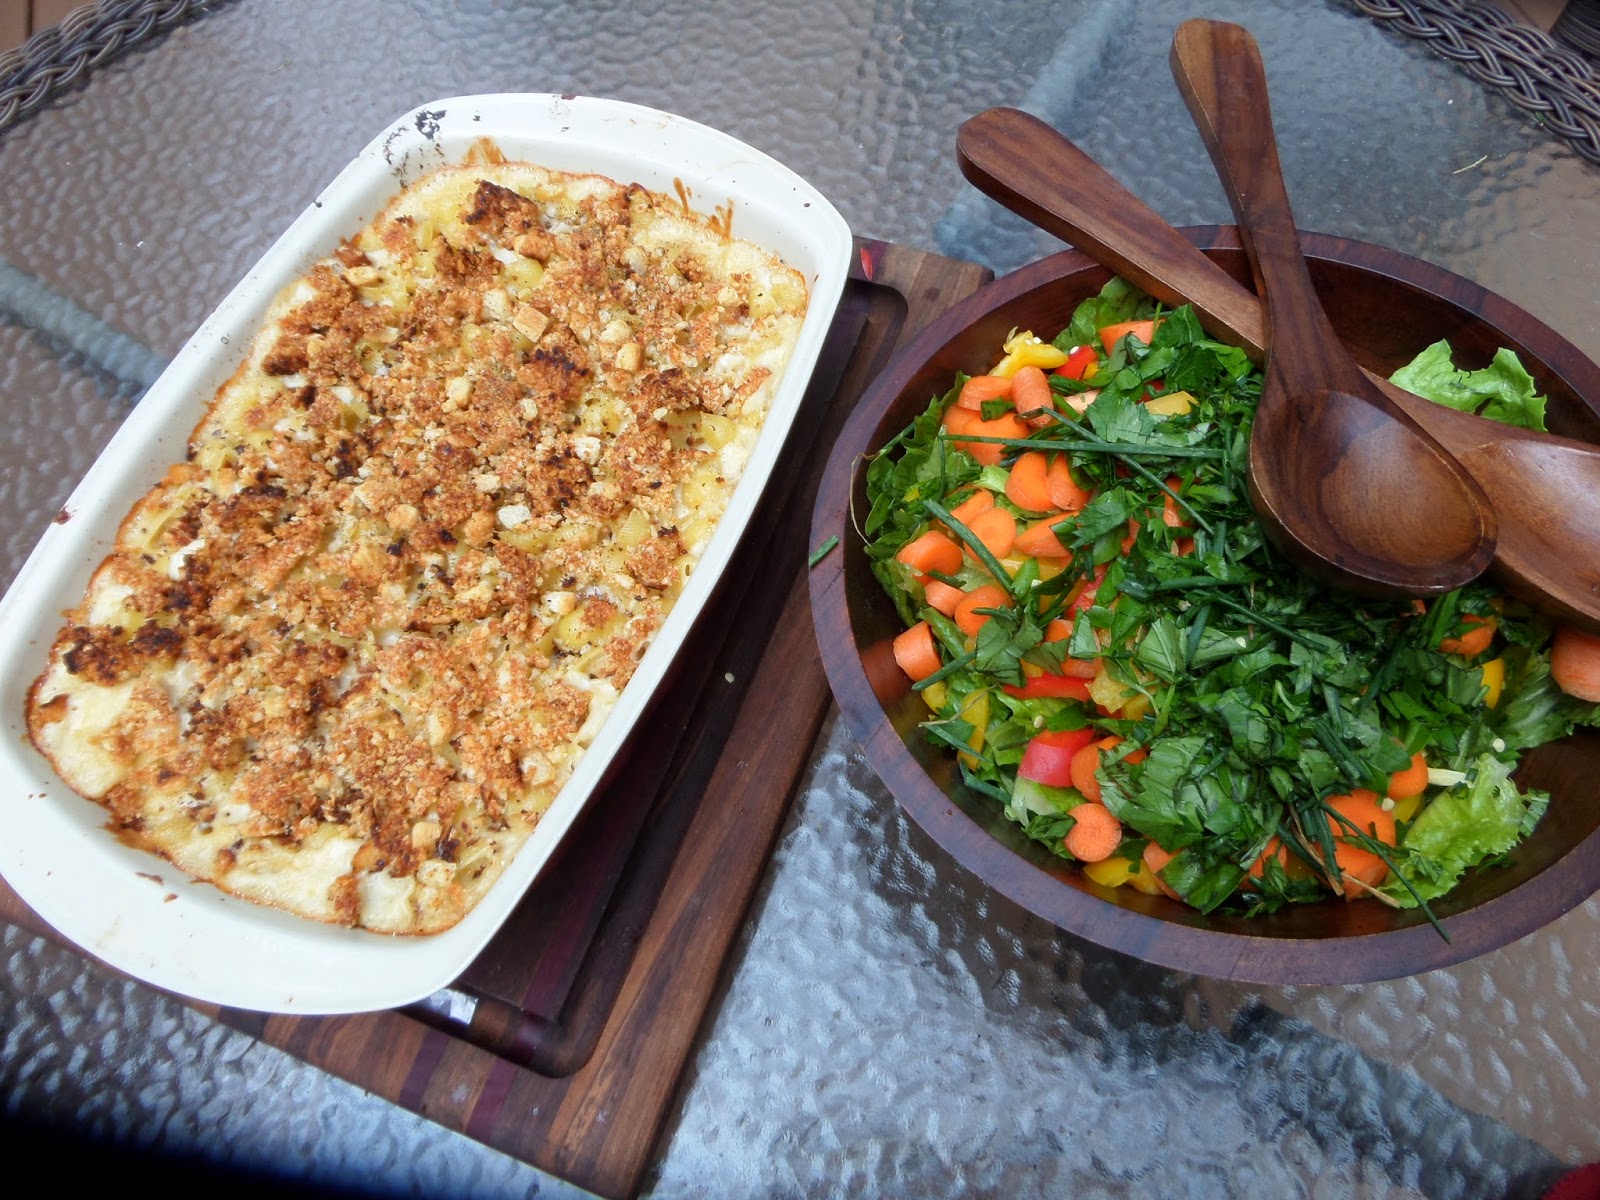
Serve with a side salad.
This was delicious. But I feel I could improve it even more--maybe using smoked gouda and adding some chevre to the sauce? Maybe toasting the bread crumbs in truffle oil? The possibilities are endless.
Enjoy!
Subscribe to:
Comments (Atom)